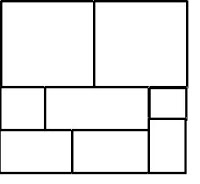
I've wanted to do this for a while, and kept meaning to... a Sea-Glass tutorial. I've made this quilt in several color and layout variations so far, and am working on yet another one, so... why not? Here it is - the Sea-Glass tutorial.
Fabric A and B— 1 yard each, Fabric C, E, F and H – ½ yard each, Fabric D and G – ¾ yard fabric, backing fabric – 3 yards
Note: all materials are in yardage, NOT fat quarters
Cutting Directions
Cut 25 of each piece: (I don’t care if you use scissors, rotary cutter, your teeth…)
A—6.5”x6.5” E—2.5”x2.5”
B—6.5”x6.5” F—5.5”x3.5”
C– 3.5”x3.5” G– 5.5”x3.5”
D—7.5”x3.5” H—2.5”x4.5”
Sewing Instructions
Cut fabric and arrange in tidy stacks. Or messy ones, whichever works best for you!
Sew Piece A to Piece B along one seam. Repeat for other sets, put aside.
Sew Piece C to Piece D along one seam. Repeat for other sets, put aside.
Sew Piece E to Piece H along one seam. Repeat for other sets, put aside.
Sew Piece F to Piece G along one seam. Repeat for other sets, put aside.
Iron all seams, either press open or press to darker side. Or press as you prefer, really. It's your quilt. And then, back to more sewing!
Sew Piece C/D sets to Piece F/G sets on one seam, Repeat for each set
Iron all seams as before.
Sew all C/D/F/G sets to E/H sets.
Iron all seams as before.
Sew all A/B sets to C-H sets, using quilt block diagram on back as a guide.
Iron once again as before.
The layout is really a personal matter - I've done two different layouts, and the one in the step-by-step pictures is going to have a third layout.
The original Sea Glass is laid out as follows:
Lay out first block with the A piece in the upper left corner. Next block to the right will have A piece in upper right corner. Next block will have A piece in lower right. Fourth will have A piece in lower left. Fifth (final) in top row will once again have the A piece in upper left corner of the block.
The second row will start with the A piece in the upper right corner, and follow the same pattern. All following rows will do the same—advance the location of the A piece by one position.
The second and third versions I did are laid out a little differently...
In this version, Piece A is matched to Piece A (making one giant Piece A that everything else turns around).
Stitch blocks together! We’re almost there! This is the part where I step back and say: Back, quilt, and bind as you prefer. Oh, and if you do make a version of Sea-Glass, let me know! I'd love to see pictures! (And I will try to get a flickr page set up for them, too!)
Enjoy!
Shay


No comments:
Post a Comment